Operating a Cst Berger laser level can greatly enhance the accuracy and efficiency of your construction or surveying projects. With its advanced technology and precise measurements, this laser level is a valuable tool in ensuring precise and reliable results.
To begin using the Cst Berger laser level, it is important to first familiarize yourself with the device and its features. The laser level typically consists of a rotating laser that emits a horizontal or vertical beam, a receiver to detect the laser beam, and a tripod to stabilize the device. It is crucial to carefully read and follow the manufacturer’s instructions to ensure proper setup and usage.
Once the laser level is set up and calibrated, you can start using it for various tasks such as leveling floors, aligning walls, or setting slopes. The laser beam emitted from the device provides a reference line or point that helps you achieve precise measurements and alignments. You can use the receiver to detect the laser beam and adjust the level accordingly.
When using the Cst Berger laser level, it is important to keep the device and the area around it free from any obstructions that may interfere with the laser beam. Also, be cautious of any reflective surfaces that could distort the beam or cause inaccuracies in the measurements. Regular maintenance of the device, including cleaning the lens and checking for any damages, is essential to ensure its proper functioning.
In conclusion, the Cst Berger laser level is a reliable and efficient tool for achieving precise measurements and alignments in construction and surveying projects. By following the manufacturer’s instructions, properly setting up the device, and maintaining it regularly, you can make the most out of this advanced technology and ensure accurate results for your projects.
Step-by-Step Guide on How to Use Cst Berger Laser Level
A Cst Berger Laser Level is a useful tool for ensuring accurate measurements and leveling in construction and surveying projects. Follow these steps to effectively use the Cst Berger Laser Level:
Step 1: Set Up the Laser Level
Choose a stable and level surface to set up the Cst Berger Laser Level. Ensure that the level is securely positioned to prevent any movement during operation. Use a tripod or mounting bracket to securely hold the laser level in place.
Step 2: Power On the Laser Level
Before using the laser level, make sure it is powered on. Most Cst Berger Laser Levels have a power button or switch that needs to be activated. Check the user manual for the specific model to determine how to power it on.
Step 3: Adjust the Laser Level
Once the laser level is powered on, you may need to adjust the settings to align the laser beam according to your requirements. Check the user manual for instructions on how to adjust the beam’s direction, angle, or rotation speed.
Step 4: Calibrate the Laser Level
Calibrating the laser level ensures accurate measurements. Some laser levels require manual calibration, while others may have self-leveling capabilities. Consult the user manual to determine the calibration procedure for your Cst Berger Laser Level.
Step 5: Use the Laser Level
After setting up, powering on, adjusting, and calibrating the laser level, it is ready to use. Point the laser level in the desired direction, and the laser beam will project onto the target surface. Use the laser beam as a reference to ensure accurate leveling or measurements.
Step 6: Maintain Safety Precautions
While using the Cst Berger Laser Level, it is crucial to prioritize safety. Do not look directly into the laser beam, as it can cause eye damage. Use protective eyewear if necessary. Additionally, be aware of any electrical or tripping hazards in the working area.
By following these step-by-step instructions, you can effectively use the Cst Berger Laser Level for your construction or surveying projects.
Preparing for Using Cst Berger Laser Level
Before you start using your Cst Berger Laser Level, it is important to prepare and familiarize yourself with its features and instructions. Taking the time to properly set up and understand the laser level will ensure accurate and efficient results.
Here are some steps to help you prepare for using the Cst Berger Laser Level:
- Read the instruction manual: It is crucial to thoroughly read the instruction manual provided by Cst Berger. This will give you a clear understanding of the laser level’s features, functions, and safety precautions.
- Gather the necessary equipment: Ensure you have all the required equipment before starting. This may include a tripod, laser target, batteries, and any other accessories that come with the Cst Berger Laser Level.
- Check the batteries: Check the battery compartment and ensure the batteries are charged or replaced if needed. Having fully charged or new batteries will prevent any interruptions during your work.
- Calibrate the laser level: Before using the laser level, it is essential to calibrate it to ensure accurate measurements. Follow the manufacturer’s instructions on how to calibrate the specific model of Cst Berger Laser Level you are using.
- Set up the tripod: Attach the laser level to a sturdy tripod to achieve stability and accuracy. Adjust the tripod’s height and ensure it is positioned on a level surface.
- Power on the laser level: Turn on the laser level and wait for it to initialize. Ensure that the laser beam is emitting correctly and is visible to the naked eye.
- Test the laser level: Before starting your actual measurements, test the laser level by ensuring it produces accurate results. Use the laser target to check if the laser beam aligns with the desired reference point.
- Adjust the laser level settings: Familiarize yourself with the different settings and modes of the Cst Berger Laser Level. This will allow you to customize the laser level according to your specific needs and preferences.
By following these preparation steps, you will ensure that you are ready to use your Cst Berger Laser Level effectively and efficiently. Taking the time to properly prepare will ultimately lead to accurate and precise measurements for your projects.
Setting up the Laser Level
Before using your CST Berger laser level, it is important to properly set it up to ensure accurate measurements. Follow these steps to set up your laser level:
- Choose a flat and stable surface for the laser level. It is best to place it on a tripod or a stable platform.
- Attach the laser receiver to the staff or a tripod to detect the laser beam if your model includes a receiver.
- Install the required batteries in the laser level, following the manufacturer’s instructions.
- Turn on the laser level by pressing the power button. Wait for it to initialize.
- Adjust the leveling feet or bubble vials to ensure the laser level is perfectly level. Use the built-in leveling mechanisms or a bubble level to do this accurately.
- Set the desired laser level mode for your specific application, such as horizontal, vertical, or both.
- Place the laser level in the desired location, making sure it is secure and stable.
- Check the laser level’s accuracy by referencing the laser beam using the laser receiver, if applicable.
- Once the laser level is set up and calibrated, you are ready to use it for your measurements and leveling tasks.
Remember to always follow the manufacturer’s instructions for your specific model of the CST Berger laser level to ensure proper setup and accurate results.
Checking the Accuracy of the Laser Level
Before starting any project with your CST Berger laser level, it is important to verify its accuracy. An inaccurate laser level can lead to incorrect measurements and an uneven or poorly aligned work result. Here are some steps to check the accuracy of your laser level:
1. Set up the Laser Level on a Stable Surface
Place the laser level on a stable surface, such as a tripod or a flat table, to ensure that it remains steady during the accuracy check.
2. Measure the Height of the Laser Beam
Position a measuring tape vertically against a wall or a piece of furniture, making sure it is level. Turn on the laser level and align the beam with the zero mark on the measuring tape.
Move the laser level up or down to different height marks on the measuring tape and check if the laser beam aligns with the corresponding marks. If the laser beam consistently aligns with the correct height marks, it indicates that the laser level is accurate.
Note: Make sure the measuring tape you use is accurate and has been properly calibrated.
3. Check the Horizontal and Vertical Alignment
Place the laser level at a known level point, such as a step or a shelf, and rotate it to project a horizontal line. Use a spirit level to verify the horizontal alignment of the laser beam. If the bubble inside the spirit level is centered, it indicates that the laser level is correctly aligned horizontally.
Next, position the laser level to project a vertical line and use the spirit level to check the vertical alignment. If the bubble inside the spirit level is centered, it indicates that the laser level is correctly aligned vertically.
Note: If the bubble inside the spirit level is not centered in either the horizontal or vertical position, refer to the user manual provided with your CST Berger laser level to adjust the leveling screws or knobs until they are properly aligned.
4. Test the Rotational Accuracy
Set the laser level at a fixed point and rotate it 360 degrees. Observe the laser beam throughout the rotation to check if it remains at a consistent level and does not deviate or waver. If the laser beam maintains its level during the rotation, it indicates that the laser level has accurate rotational capabilities.
By following these steps to check the accuracy of your CST Berger laser level, you can ensure that your measurements and alignment are precise, leading to a successful and professional-looking project.
Using the Cst Berger Laser Level
The Cst Berger laser level is a powerful tool that can make your construction or DIY projects much easier and more efficient. Here are some steps to help you use it effectively:
- Set up the laser level: Start by choosing a stable and level surface to place the laser level on. Make sure the surface is free from any debris or obstructions that could affect the accuracy of the measurements. Use the built-in leveling bubble to ensure that the laser level is properly levelled before you start using it.
- Turn on the laser: Once the laser level is properly set up, turn it on by pressing the power button. The laser beam will be projected onto the surface, providing a reference line or point for your measurements.
- Adjust the laser: Depending on your specific needs, you may need to adjust the laser level to achieve the desired measurements. Most Cst Berger laser levels have adjustable settings such as rotating the laser in different directions or changing the angle of the laser beam. Refer to the user manual for instructions on how to adjust these settings.
- Measure and mark: With the laser level properly set up and adjusted, you can now start measuring and marking your desired points or lines. Use a measuring tape or ruler to take accurate measurements from the laser beam. Make sure to mark the points or lines with a pencil or marker for future reference.
- Check for accuracy: After marking your points or lines, it’s important to double-check the accuracy of your measurements. Use a level or measuring tool to verify that the marked points or lines are aligned correctly. This will help ensure the quality and precision of your project.
- Clean and store the laser level: Once you have finished using the Cst Berger laser level, turn it off and clean any dirt or dust that may have accumulated on the device. Store it in a safe and dry place to protect it from damage and ensure its longevity.
By following these steps, you can effectively use the Cst Berger laser level and achieve accurate measurements for your construction or DIY projects. Remember to always refer to the user manual for specific instructions and safety guidelines to ensure the proper use of the laser level.
Basic Operation of the Laser Level
To use a CST Berger laser level, follow these basic steps:
1. Set up the laser level
Place the laser level on a stable surface or attach it to a tripod for better stability. Make sure it is level and secure before use.
2. Power on the laser level
Turn on the laser level by pressing the power button or switch. The laser beam will start projecting once the power is on.
3. Adjust the laser level
Use the built-in controls to adjust the laser level’s alignment. Most laser levels have knobs or buttons to move the laser beam horizontally and vertically.
4. Level the laser beam
Use the built-in bubble vials or electronic leveling system to ensure the laser beam is perfectly level. Make any adjustments necessary to achieve the desired level.
5. Use the laser beam
With the laser level properly set up and aligned, you can now use the laser beam as a reference point for various applications. It can help with installing shelves, aligning pictures, or any other task that requires a straight and level line.
6. Power off the laser level
When you have finished using the laser level, turn it off to conserve battery power. This will also ensure the laser beam is no longer projecting.
Note: Always refer to the user manual for specific instructions on operating your particular CST Berger laser level model.
Advanced Features of the Laser Level
The Cst Berger Laser Level comes equipped with a range of advanced features that make it a versatile and powerful tool for a variety of projects. Here are some of the key advanced features:
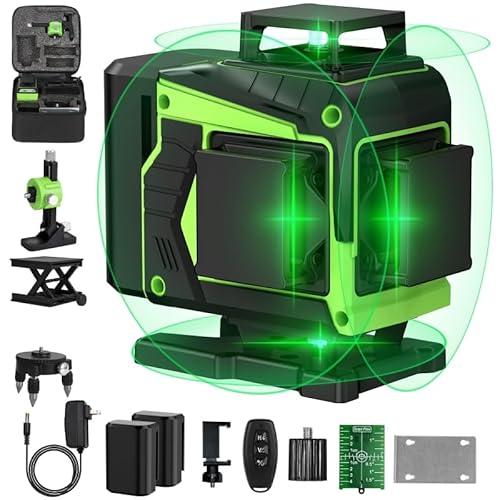
1. Self-leveling
The self-leveling feature of the Cst Berger Laser Level allows it to automatically adjust and level itself within a specified range. This makes it easy to set up and ensures accurate measurements even on uneven surfaces. The self-leveling feature saves time and effort by eliminating the need for manual adjustments.
2. Remote control
The Cst Berger Laser Level comes with a remote control that allows you to operate the laser level from a distance. This feature is especially useful when working on large projects or when the laser level is mounted on a tripod. The remote control allows you to easily switch between different laser modes and adjust the laser level’s settings without having to physically approach the device.
3. Multiple laser modes
The Cst Berger Laser Level offers multiple laser modes to suit different needs. These include horizontal, vertical, and cross-line modes. The horizontal mode generates a laser beam in a horizontal line, while the vertical mode generates a laser beam in a vertical line. The cross-line mode generates both horizontal and vertical lines simultaneously, forming a cross. These different modes allow you to tackle a wide range of projects with precision and ease.
4. Out-of-level indicator
The out-of-level indicator feature of the Cst Berger Laser Level alerts you when the device is not level, ensuring accurate readings. When the laser level is not leveled within the specified range, an indicator light or sound will be activated, prompting you to make the necessary adjustments. This feature helps prevent errors and ensures the quality of your work.
5. Pulse mode
The pulse mode feature of the Cst Berger Laser Level allows the laser beam to be detected by a laser receiver or detector. This enables you to use the laser level outdoors or in bright light conditions where the laser beam may not be visible to the naked eye. The pulse mode increases the range and versatility of the laser level, making it suitable for a wide range of applications.
With these advanced features, the Cst Berger Laser Level provides accuracy, convenience, and flexibility, making it an indispensable tool for professionals and DIY enthusiasts alike.