


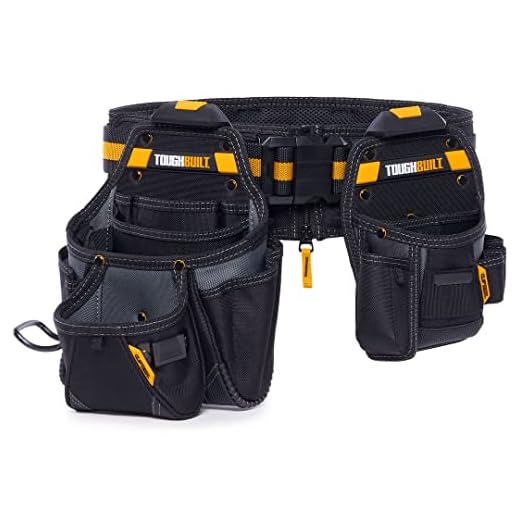
Adjusting your Toughbuilt tool belt is essential for achieving optimal comfort and functionality while working on your projects. The right fit ensures that your tools are easily accessible and well-balanced throughout the day. Whether you’re a professional tradesperson or an avid DIYer, understanding how to adjust your tool belt properly can make a world of difference.
First, start by loosening all the straps of your Toughbuilt tool belt. This will allow you to easily adjust the belt to your desired snugness. Next, slide the belt around your waist and fasten the buckle securely. It’s important to ensure that the buckle is centered and that the belt is positioned comfortably on your hips.
Once the belt is fastened, tighten the straps one at a time. Start with the strap that goes around your waist, securing it tightly without causing discomfort or restricting movement. Then, adjust the straps that go around your thighs and legs, making sure they are snug but not too tight.
To achieve the perfect fit, take a moment to walk around and perform some movements to test the comfort and stability of your adjusted tool belt. If needed, make further adjustments until you find the balance that works best for you. Remember to regularly check and readjust your tool belt as needed to maintain optimal comfort and support throughout your workday.
Essential Tips for Adjusting Your Toughbuilt Tool Belt
Adjusting your Toughbuilt tool belt is an important step in optimizing your comfort and productivity. Proper adjustments ensure that your tools are easily accessible and that the belt sits securely around your waist. Here are some essential tips for making the necessary adjustments:
1. Find the Perfect Fit
Before wearing your tool belt, it’s crucial to ensure that it fits properly. Start by loosening all the straps and then put the belt around your waist. Adjust the buckle so that it comfortably fits snugly around your waist. You should be able to move freely without feeling restricted. Make sure it’s tight enough to prevent it from slipping down or sagging while you work.
2. Adjust the Shoulder Straps
To distribute the weight of the tool belt more evenly and reduce strain on your lower back, adjust the shoulder straps. Tighten or loosen the shoulder straps until they’re snug but not too tight. This will help alleviate any pressure or discomfort that may result from carrying a heavy load.
3. Balance the Load
Take the time to distribute the weight of your tools evenly across the tool belt. This will prevent any unnecessary strain on your lower back and hips. Heavier tools should be placed closer to the center of your body to maintain balance and stability. Experiment with different arrangements until you find what feels most comfortable for you.
Following these essential tips will help you to adjust your Toughbuilt tool belt to fit your body properly and maximize your comfort while working. Remember that everyone’s body is different, so don’t be afraid to make further adjustments until you find the perfect fit. A well-adjusted tool belt will not only enhance your productivity but also reduce the risk of injuries and discomfort.
Understanding the Importance of Proper Adjustment
Adjusting your Toughbuilt tool belt properly is crucial for ensuring comfort, safety, and efficiency while working. A tool belt that is not properly adjusted can cause discomfort, lead to strain or injuries, and hinder your ability to access and use tools effectively.
Proper adjustment starts with finding the right size tool belt for your waist. Your tool belt should fit snugly around your waist without being too tight or too loose. A loose belt can shift and slide, causing distractions and making it harder to reach for your tools. On the other hand, a belt that is too tight can restrict movement and cause discomfort.
Once you have the right size belt, you can adjust it further for a personalized fit. Most Toughbuilt tool belts feature adjustable straps that allow you to tighten or loosen them according to your preference. Take the time to experiment with different adjustments and find the one that feels the most comfortable and secure for you.
Remember that the weight distribution of your tools is also important. Ideally, your heavier tools should be evenly distributed across your hips and lower back to minimize strain on your body. You may need to rearrange the pockets and pouches on your tool belt to achieve proper weight distribution.
Proper adjustment also means ensuring that your tools are easily accessible. When your tool belt is adjusted correctly, you should be able to reach your tools without straining or stretching excessively. This saves time and increases efficiency, allowing you to focus on the task at hand.
Regularly check and readjust your tool belt as needed. Over time, the straps may stretch or loosen, and tools may shift positions. Stay aware of any discomfort or unusual strain on your body while working and make the necessary adjustments to prevent injuries.
By understanding the importance of proper adjustment and taking the time to adjust your Toughbuilt tool belt correctly, you can enhance your working experience and enjoy the benefits of increased comfort and efficiency.
Preparing Your Tool Belt for Adjustment
Before you start adjusting your Toughbuilt tool belt, it’s important to prepare it properly. Taking the time to get everything ready will ensure a smooth and successful adjustment process.
1. Gather Your Tools
First, gather all the necessary tools you’ll need to adjust your tool belt. This may include a tape measure, a screwdriver, and any additional hardware or accessories provided by Toughbuilt. Having everything on hand will save you time and frustration.
2. Empty Your Tool Pouches
Next, empty out all the tools and equipment from your tool pouches. This will make it easier to access and adjust the belt itself. Lay out your tools in a organized manner so you can easily find and reposition them once the adjustment is complete.
3. Inspect and Clean
Take a moment to inspect your tool belt for any signs of damage or wear. Check for loose stitching, broken buckles, or any other issues that could affect the functionality of the belt. If you notice any problems, address them before proceeding with the adjustment. Additionally, wipe down the belt with a damp cloth to remove any dirt or debris.
4. Follow the Manufacturer’s Instructions
Finally, consult the manufacturer’s instructions for your specific Toughbuilt tool belt model. The instructions will provide you with step-by-step guidance on how to adjust the belt correctly. It’s important to follow these instructions to ensure the best fit and performance of your tool belt.
By properly preparing your tool belt for adjustment, you’ll set yourself up for success. Taking the time to gather your tools, empty your pouches, inspect and clean the belt, and follow the manufacturer’s instructions will result in a properly adjusted tool belt that fits comfortably and securely.
Adjusting the Belt Length and Width
To adjust the Toughbuilt tool belt to your desired length and width, follow these simple steps:
- Start by loosening the belt buckle or release mechanism, depending on the specific model of your tool belt.
- Slip the belt off your waist and lay it flat on a clean, sturdy surface.
- Determine the desired length by measuring the distance between the buckle and the desired position for the belt to sit on your waist.
- Slide the belt through the buckle or release mechanism, leaving an appropriate amount of excess length for adjustments.
- Secure the belt by fastening the buckle or engaging the release mechanism, making sure it is snug but not too tight.
- Check the fit by putting on the tool belt and moving around to ensure it is comfortable and properly positioned on your waist.
If the belt is too long, repeat steps 1-6 and make additional adjustments as needed. If the belt is too short, you may need to consider purchasing an extension or a larger size.
Remember to always double-check the adjustments and tighten the belt properly to prevent it from sliding or coming loose while you are working. A properly adjusted Toughbuilt tool belt will provide you with the support and functionality you need for your work.
Achieving an Optimal Fit with Tool Belt Pouches
When using a Toughbuilt tool belt, it’s important to ensure that your tool belt pouches fit properly. Achieving an optimal fit not only ensures comfort but also allows for easy access to your tools and prevents them from falling out. Here are some tips on how to adjust your Toughbuilt tool belt pouches for the perfect fit:
- Find the right placement: Start by deciding where you want your tool belt pouches to sit on your body. Typically, they should be positioned on your dominant side, either on your waist or hips. Experiment with different placements to find the most comfortable and convenient spot for you.
- Adjust the belt length: Once you have determined the ideal placement, adjust the belt length accordingly. The tool belt should fit snugly around your waist or hips without being too tight or too loose. Secure the belt buckle and check for any adjustments needed.
- Secure the pouches: Most Toughbuilt tool belt pouches come with adjustable straps or buckles to secure them in place. Make sure to tighten these straps to prevent the pouches from moving around and potentially causing discomfort or hindering your movements.
- Balance the weight: If you are carrying multiple tool belt pouches, it’s important to distribute the weight evenly. Ensure that the heavier tools are evenly distributed on both sides of your tool belt to maintain balance and avoid strain on one side of your body.
- Test for mobility: Once you have made all the necessary adjustments, take a moment to test your mobility. Move around, crouch, and perform various tasks to see if the tool belt pouches restrict your movements in any way. If you experience any discomfort or limitations, make further adjustments as needed.
- Regularly check and readjust: Over time, your tool belt pouches may require readjustment due to changes in body shape or weight load. Make it a habit to regularly check the fit of your tool belt pouches and make any necessary readjustments to maintain optimal comfort and functionality.
By following these tips, you can achieve an optimal fit with your Toughbuilt tool belt pouches, ensuring comfort, convenience, and efficiency in your work. Remember that the perfect fit may vary for each individual, so don’t hesitate to experiment and make adjustments until you find the most suitable configuration for you.
Adjusting the Tool Belt Strap Tension
Properly adjusting the strap tension of your Toughbuilt tool belt is essential for comfort and functionality. The strap tension determines how securely the belt sits on your waist, preventing it from sagging or feeling too tight. Follow these steps to adjust the strap tension of your tool belt:
1. Loosening the Strap
Begin by locating the buckle on the strap. Depending on the model of your Toughbuilt tool belt, the buckle may be located on the side or front of the belt. Push the lever or release button on the buckle to loosen the strap.
2. Adjusting the Strap
Once the strap is loosened, place the tool belt around your waist at the desired position. Pull the loose end of the strap to tighten it, ensuring it is snug but not uncomfortably tight. Make sure the belt sits evenly on your hips.
Pro tip: If you find it difficult to tighten the strap while wearing the tool belt, try fastening the buckle before putting it on and then adjusting the strap tension once it is in place.
3. Securing the Strap
After adjusting the strap to the desired tension, secure it in place by pushing the lever or button on the buckle until it clicks into position. This will ensure the strap stays in place while you work.
Repeat the adjustment process as needed to achieve the perfect strap tension for your comfort and support. Remember, a properly adjusted tool belt will enhance your performance and reduce strain on your body during long hours of work.
Regular Maintenance to Keep Your Tool Belt in Top Shape
Once you’ve adjusted your Toughbuilt tool belt to fit your body comfortably, it’s important to keep it well-maintained to ensure its longevity and optimal performance. Regular maintenance can help prevent any issues or damage that may arise from regular use.
Cleaning:
Regularly clean your tool belt to remove any dirt, dust, or debris that may accumulate. Use a soft brush or cloth to gently wipe away any surface dirt. For more stubborn stains, you can use a mild detergent and water solution. Be sure to rinse thoroughly and allow it to air dry completely before using again.
Inspecting:
Regularly inspect your tool belt for any signs of wear and tear. Look for any loose stitching, fraying straps, or damaged pockets. If you notice any issues, repair them promptly to prevent further damage. You can reinforce stitching with strong thread or use patching material for small tears.
Lubricating:
Check the function of any moving parts, such as buckles or zippers, and ensure they are well-lubricated. Use a silicone-based lubricant to prevent rust and keep the mechanisms working smoothly.
Adjustments:
As time goes on, you may find that you need to readjust your tool belt for optimal comfort and performance. Regularly check the fit and make any necessary adjustments to ensure it remains snug without being too tight or loose.
By following these regular maintenance practices, you can keep your Toughbuilt tool belt in top shape and extend its lifespan, ensuring it continues to serve you well on all your projects.
FAQ
Is it necessary to adjust a ToughBuilt tool belt for a perfect fit?
Yes, it is important to adjust a ToughBuilt tool belt for a perfect fit. A properly adjusted tool belt ensures that it sits comfortably on your waist without causing any discomfort or strain. It also allows for easy access to your tools and items, increasing your efficiency and productivity. Additionally, a well-fitted tool belt reduces the risk of accidents or injuries by keeping the weight evenly distributed and preventing the belt from slipping or sagging. Take the time to adjust your ToughBuilt tool belt to achieve the best fit possible.


