If you are a car owner, you may find yourself facing the daunting task of changing or replacing your serpentine belt at some point. This vital component of your vehicle’s engine is responsible for powering several essential components, such as the alternator, power steering pump, and air conditioning compressor. Without a properly functioning serpentine belt, your car’s performance could be severely affected. Fortunately, with the right tools and a little know-how, you can easily tackle this job on your own.
One tool that can make the process of changing your serpentine belt a breeze is a serpentine belt tool kit. This handy kit typically includes a tensioner tool, a set of sockets, and various adapters that can be used to work with different types of tensioner pulleys. The tensioner tool is specifically designed to fit onto the tensioner pulley and apply the necessary pressure to release tension on the belt, allowing for easy removal and installation. With this tool kit, you can save both time and effort when working on your serpentine belt.
Before you begin, it’s essential to ensure that you have the correct size and type of serpentine belt for your specific vehicle. You can typically find this information in your car’s owner’s manual or by consulting with a trusted mechanic. Once you have the right belt and your serpentine belt tool kit, you can proceed with the following steps:
Step 1: Locate the serpentine belt routing diagram under the hood of your vehicle. This diagram will show you the path that the belt takes around all the pulleys in your engine. Take a moment to study the diagram and familiarize yourself with the correct routing.
Step 2: Use the serpentine belt tool kit to release tension on the old belt. The tensioner tool should fit snugly onto the tensioner pulley. Use a socket wrench or breaker bar to rotate the tensioner tool in the direction indicated on the tool or the tensioner pulley itself. This will release tension on the belt and allow you to remove it from the pulleys.
Step 3: Carefully thread the new serpentine belt around the pulleys, following the routing diagram you located in step 1. Make sure the belt is properly seated on each pulley and that it is not twisted or misaligned.
Step 4: Once the new belt is in place, use the tensioner tool to apply pressure and release tension on the belt. This will ensure that the belt is properly tensioned and will function correctly. Double-check the belt routing to ensure it matches the diagram before releasing the tensioner tool.
Step 5: Start your vehicle’s engine and listen for any unusual noises or vibrations that could indicate a problem with the new belt. If everything sounds and feels normal, you can consider the job done!
By following these steps and using a serpentine belt tool kit, you can confidently tackle the task of changing your serpentine belt. Remember to always consult your vehicle’s manual or seek professional advice if you have any concerns or doubts. With a little practice, you’ll become a pro at maintaining your car’s serpentine belt and keeping your engine running smoothly.

What is a Serpentine Belt Tool Kit?
A serpentine belt tool kit is a set of tools designed to help with the installation and removal of serpentine belts in vehicles. The serpentine belt is an essential component of a vehicle’s engine system, as it drives various engine accessories, such as the alternator, power steering pump, and air conditioning compressor.
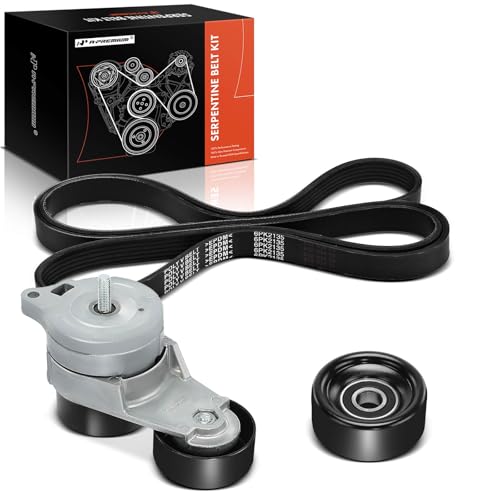
The tool kit typically includes a range of specialized tools that are specifically designed to fit and engage the various belt tensioners, pulleys, and other components involved in the serpentine belt system. These tools allow for safe and efficient installation or removal of the serpentine belt without causing damage to the belt or the surrounding components.
One of the key tools in a serpentine belt tool kit is the belt tensioner tool. The belt tensioner is responsible for maintaining the proper tension of the belt to ensure optimal performance and prevent slippage. The tensioner tool is used to rotate and compress the tensioner, allowing the belt to be easily installed or removed.
In addition to the tensioner tool, a serpentine belt tool kit may also include a selection of sockets, wrenches, and other tools needed to access and manipulate the various components of the serpentine belt system. Some kits may even include a belt alignment tool to ensure that the belt is properly aligned on the pulleys for efficient operation.
Benefits of Using a Serpentine Belt Tool Kit
Using a serpentine belt tool kit offers several benefits:
- Easier Installation and Removal: The specialized tools in the kit are designed to make the process of installing or removing a serpentine belt easier and more efficient, reducing the risk of damage to the belt or other components.
- Safety: The proper use of a serpentine belt tool kit can help ensure the safety of the user by reducing the risk of injury when working on the belt or surrounding components.
- Cost savings: By having the right tools for the job, a serpentine belt tool kit can help prevent the need for costly repairs caused by improper installation or removal of the belt.
Overall, a serpentine belt tool kit is an essential set of tools for any automotive enthusiast or professional technician who regularly works on serpentine belt systems. It provides the user with the necessary tools to safely and efficiently install or remove serpentine belts, ensuring proper operation and longevity of the vehicle’s engine system.
Understanding the Function and Importance of the Kit
The serpentine belt tool kit is an essential tool for maintaining and repairing the serpentine belt in your vehicle. This kit allows you to easily remove and install the serpentine belt without damaging any other components in the process. It is designed to provide convenience and efficiency when working with the serpentine belt, ensuring that it is properly tensioned and aligned.
Function of the Kit
The serpentine belt tool kit typically includes a variety of tools that are necessary for removing and installing the serpentine belt. These tools are specifically designed to fit the different components of the belt system, making the task easier and more efficient. The kit often includes a belt tensioner tool, a belt removal tool, a belt installation tool, and various belts for different vehicle models.
The belt tensioner tool is used to release tension on the serpentine belt, allowing for easy removal or installation. It typically features an adjustable handle or ratchet mechanism to ensure that the correct level of tension is applied to the belt. This tool is crucial in preventing damage to the belt or other engine components during the process.
The belt removal and installation tools are designed to fit the specific grooves and pulleys of the serpentine belt system. These tools allow for easy removal and installation of the belt, ensuring proper alignment and tension. They help to prevent any twisting or misalignment of the belt, which could lead to premature wear or failure.
Importance of the Kit
The serpentine belt plays a vital role in the functioning of your vehicle’s engine. It drives essential components such as the alternator, power steering pump, and air conditioning compressor. Without a properly functioning serpentine belt, these components would not receive the necessary power to operate effectively.
Regular maintenance and replacement of the serpentine belt is crucial to prevent breakdowns and ensure the overall performance of your vehicle. The serpentine belt tool kit allows you to complete these tasks with ease and accuracy. By having the necessary tools readily available, you can save both time and money by avoiding unnecessary trips to the mechanic.
Additionally, using the serpentine belt tool kit ensures that the belt is installed correctly, preventing any potential damage to the belt or surrounding components. Proper tensioning and alignment of the belt are essential for its longevity and overall performance.
In conclusion, the serpentine belt tool kit is a valuable asset for any vehicle owner or mechanic. It allows for easy removal, installation, and maintenance of the serpentine belt, preventing any potential damage or breakdowns. By using this kit, you can ensure the proper functioning of your vehicle’s engine and avoid costly repairs down the road.
How to Use a Serpentine Belt Tool Kit
A serpentine belt tool kit is an essential tool for any DIY mechanic or car owner. This kit allows you to properly install and remove serpentine belts with ease. Whether you need to replace a worn-out belt or perform maintenance on your vehicle’s engine, a serpentine belt tool kit is a must-have.
Step 1: Gather the Necessary Tools
Before getting started, make sure you have all the necessary tools from the serpentine belt tool kit. Typically, a serpentine belt tool kit includes a serpentine belt tool, various sockets and handles, and a belt tensioner tool. Having these tools on hand will ensure a smooth and efficient belt replacement process.
Step 2: Identify the Belt Routing
Prior to removing the old serpentine belt, it’s important to identify the belt routing. This information can usually be found in the vehicle’s owner’s manual or through online resources. The belt routing diagram will show you the path the new belt needs to follow, ensuring it is installed correctly.
Step 3: Loosen the Belt Tensioner
The next step involves loosening the belt tensioner. Using the belt tensioner tool from your serpentine belt tool kit, apply pressure to the belt tensioner and move it in the opposite direction of the belt’s rotation. This will relieve the tension on the belt and allow for easy removal.
Step 4: Remove the Old Belt
Once the tension has been released, remove the old serpentine belt by sliding it off the pulleys. Be sure to note the belt’s path as it comes off the pulleys, as this will be helpful when installing the new belt.
Step 5: Install the New Belt
With the old belt removed, it’s time to install the new serpentine belt. Begin by following the belt routing diagram you identified earlier. Slide the new belt over the pulleys, making sure it follows the correct path. Use the serpentine belt tool to again apply pressure to the tensioner, allowing for easy installation.
Step 6: Test the Belt Tension
After installing the new serpentine belt, it’s important to test the tension. Use the belt tensioner tool to apply pressure to the belt and ensure it is properly tensioned. The correct tension will ensure optimal performance and longevity of the belt.
Step 7: Double-Check Everything
Once you’ve tested the belt tension, double-check that everything is in place. Make sure the belt is properly aligned on all the pulleys and that there are no twists or kinks. Additionally, inspect the belt tensioner and any other components you may have touched during the installation process to ensure they are secure.
By following these easy steps and utilizing a serpentine belt tool kit, you can confidently install or replace a serpentine belt on your vehicle. Regularly inspecting and replacing your serpentine belt is crucial for the overall performance and longevity of your engine, so don’t neglect this important maintenance task.
Step-by-Step Instructions
Follow these step-by-step instructions to learn how to use a serpentine belt tool kit:
- Ensure the engine is cool before starting any work on the serpentine belt.
- Locate the serpentine belt tensioner. The tensioner is typically a pulley with a square hole in the center.
- Insert the square end of the serpentine belt tool into the square hole of the tensioner and rotate it counterclockwise to release tension on the belt.
- While maintaining tension on the belt with the tool, use your other hand to carefully slide the belt off one of the pulleys. Be sure to note the routing of the belt for reinstallation.
- Slowly release tension on the belt using the tool, allowing it to rest on the tool while you remove the tool from the tensioner.
- Continue removing the belt from the remaining pulleys, being careful not to damage any other components.
- To install a new serpentine belt, route it around all the pulleys according to the belt routing diagram, ensuring it is properly seated on each pulley.
- Insert the square end of the serpentine belt tool into the tensioner again and rotate it counterclockwise to release tension on the new belt.
- While maintaining tension on the belt, carefully slide it onto the last pulley, again making sure it is properly seated on each pulley.
- Slowly release tension on the belt using the tool, allowing it to rest on the tool while you remove the tool from the tensioner.
- Double-check the belt routing to ensure it is correct and properly aligned on all the pulleys.
- Start the engine and let it run for a few minutes to ensure the belt is functioning properly.
- Inspect the belt for any signs of wear or damage regularly and replace as needed.
Following these step-by-step instructions will help you effectively use a serpentine belt tool kit and keep your vehicle’s belts in good working condition.
Tips and Precautions for Using a Serpentine Belt Tool Kit
When using a serpentine belt tool kit, it is important to follow some tips and precautions to ensure the safe and efficient replacement of your serpentine belt. Here are some guidelines to keep in mind:
1. Safety First: Always put safety first when working on your vehicle. Wear appropriate protective gear, such as gloves and safety glasses, to prevent any injuries.
2. Familiarize Yourself with the Kit: Before starting the process, take the time to familiarize yourself with the components of the serpentine belt tool kit. Understand how each piece works and how it should be used.
3. Read the User Manual: Read the user manual provided with your serpentine belt tool kit. The manual will provide you with essential instructions, safety guidelines, and tips specific to your kit.
4. Park on a Level Surface: Work on your vehicle on a level surface to prevent it from rolling or shifting during the replacement process.
5. Identify Proper Belt Routing: Before removing the old serpentine belt, take a picture or draw a diagram of its routing. This will help you in correctly installing the new belt.
6. Use the Correct Tools: Ensure that you are using the correct tools from the serpentine belt tool kit for your vehicle’s make and model. Using incorrect tools can lead to damage or improper installation.
7. Follow the Belt Tensioner’s Instructions: Pay close attention to the instructions provided with the belt tensioner tool. Incorrect use of the tensioner can result in damage to the belt or pulleys.
8. Check Pulleys and Tensioner: Before installing the new serpentine belt, inspect the pulleys and tensioner for any signs of damage, wear, or misalignment. Replace any faulty components to ensure optimal performance.
9. Route the Belt Correctly: Refer to your picture or diagram to route the new serpentine belt correctly. Ensure that the belt is properly aligned with all pulleys and follows the exact path as the old belt.
10. Apply Proper Tension: Use the provided belt tensioner tool to apply the appropriate tension to the new belt. A lack of tension can result in slippage, while excessive tension can damage the belt or pulleys.
11. Double-Check the Installation: After installing the new serpentine belt, double-check its alignment and tension. Start the engine and listen for any abnormal noises or vibrations. If any issues arise, immediately turn off the engine and assess the situation.
By following these tips and precautions, you can confidently and safely use a serpentine belt tool kit to replace your vehicle’s serpentine belt. However, if you are unsure or uncomfortable performing this task yourself, it is always best to consult a professional mechanic.
FAQ
What is a serpentine belt tool kit?
A serpentine belt tool kit is a set of tools designed to help you remove and install a serpentine belt in your vehicle. It typically includes a belt tensioner tool, a socket or wrench for turning the tensioner pulley, and sometimes additional tools for accessing hard-to-reach areas.
Why do I need a serpentine belt tool kit?
You need a serpentine belt tool kit to properly remove and install a serpentine belt in your vehicle. The belt tensioner can be difficult to access and requires a specific tool to release the tension and remove the belt. Using a serpentine belt tool kit ensures that you can safely and effectively replace the belt without damaging any components.